CUSTOMIZE LINE ITEMS
Xactware’s carefully researched and validated pricing information can
significantly reduce the amount of time that it takes to research and
negotiate pricing for individual items. However, there may be times when
you need to manually adjust unit pricing or other settings to achieve
the most accurate estimate.
The Quick
Entry pane
View
depreciation calculations
Hide
the Quick Entry pane
Formulas
Add
a Miscellaneous Item
Attachments
Delete an
attachment
Set
salvage or restoration details
View item details
Add item tags
Modify
the item unit price
View
sales tax calculations
Mark
an item as paid when incurred
How to edit line item
properties
Add
Overhead and Profit to an item
Change an activity code
Related topics
Use the Quick Entry pane to add a new line item or customize
existing line item settings.

Each setting in the Quick Entry pane can be adjusted and will affect
the final calculation of your line item.
- Cat: Line items are organized
into material and labor categories such as painting or roofing. Use
the Cat list to select or change a category.
- Sel: Each line item in a category has a unique selector.
Use the Sel list to select or change a selector.
- Act: Use the Act list to select the action that will be used to
calculate the line item. Select from the following actions:
- Replace
- Remove
- Remove and Replace
- Detach & Reset
- Material Only
- Install Only
- Available actions will depend on the line
item. For example, you cannot detach and reset a layer of paint, so
that option will not be available.
- Desc: This brief description of the line item can be edited.
Learn how to view a more detailed description.
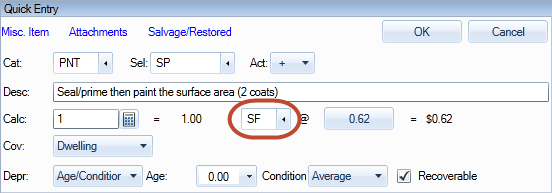
- Calc: On the calculation line, you can adjust the line item quantity
and quick-edit the unit price.
- To change the quantity, click the Calculator icon
 . Enter a number, variable,
or formula. Learn more about variables.
Learn more about formulas .
. Enter a number, variable,
or formula. Learn more about variables.
Learn more about formulas .
- To change the unit of measurement, click the Unit of Measure
list.
 .
.
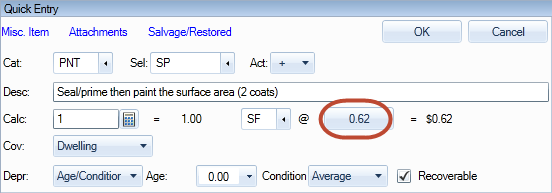
- To quick-edit the unit price, click the Unit Price button,
and type a new unit price.
- Depr: On the depreciation line,
you can adjust the depreciation calculation information.
- Click the Depreciation list to indicate how depreciation is
calculated. You can select from Amount, Percent, or Age/Condition.
- In the amount box, indicate an amount or percentage for the
depreciation.
- In the Age box, enter the age of the line item. Clicking the
Age box will also open a calendar that allows you to calculate
age based on the date purchased.
- In the Recoverable box, indicate whether or not depreciation
is recoverable for this line item.
- On the Estimate Items
tab, click Items.
- Select a line item.
- Click Depreciation to the
right of the Quick Entry Pane.
 Learn more about depreciation.
- Right-click a line item.
- Click Show Line Item Entry Pad.
- Select Show Line Item Entry Pad
to view the Quick Entry pane again.
The Xactimate Formulas wizard helps
you calculate quantities for less common situations, such as the cubic
yards of concrete in a trapezoidal wall or the number of shingles in a
circular roof.
- On the Estimate Items
tab, click Items.
- Select a line item.
- Click the Calculator
icon in the Quick Entry pane.
- Click Formulas
to view a complete list of available formulas.
- Select a formula, and enter
the required information. Click OK.
To add an item that is not included in the price list:
- On the Estimate Items
tab, click Items.
- In the Grouping pane, select a room.
- Select the blank row in the line item list area.
- Click Misc. Item in the
Quick Entry Pane.
- Select a category for the miscellaneous item. The selector will
be MISC.
- Select an activity, and type a description.
- Set the calculation and depreciation settings for your item.
- Click OK to add your item.
You can attach notes, images, or sound files to a line item.
- On the Estimate Items
tab, click Items.
- Click Attachments in the
Quick Entry pane.
- Type your note, and click Close.
- To add multiple notes, click Add.
- Click the Note list to
an image or a sound file.
- Enter the information for your image or sound file. You can also
type a text note that will be included with your file.
- Click Load to upload your
image or sound file.
See also: Annotations
and Use Notes
to add a photo
- On the Estimate Items
tab, click Items.
- Click Attachments in the
Quick Entry pane.
- Select an attachment, and click Delete.
- On the Estimate Items tab, click Items.
- In the Quick Entry pane, add or select the item you wish to edit.
- Click Salvage/Restored
at the top of the pane.
- Select a salvage type and amount.
- In the Quick Entry pane, click OK
to add the item.
See also: Salvage/Restored
- On the Estimate Items
tab, click Items.
- Select the line item you wish to view.
- Click Item Image to the
right of the Quick Entry Pane.
- Click Click for Detail.
You can append custom data to line items with tags. Tags have no effect
on the default functions in the estimate but can be used to provide additional
item information such as a vendor ID number or contact information.
- On the Estimate Items
tab, click Items.
- Select a line item.
- Click Tags to the right
of the Quick Entry Pane.
- The default tag is a date tag. The default date is the date you
added the line item in Xactimate.
- To add another tag, click Add
Tag.
- Select a tag, or select SmartList
to add a custom tag.
- Enter the tag information.
See also: Parameters - Add Ons
- On the Estimate Items
tab, click Items.
- Select a line item.
- Click Unit Price to the
right of the Quick Entry Pane.
- Indicate the line item settings:
- O&P – Indicate if overhead
and profit will be applied for this line item. If this option
is not available, O&P will be greyed out.
- Taxable – Indicate whether or not the line item is tax exempt.
- Contractor – Indicate whether the homeowner
or a contractor will be performing the labor.
- Line item – Indicate whether the item is a line item or a credit.
Credit item prices appear in red.
- If a contractor is performing the work, you can change the Trade
to indicate if the default contractor type is incorrect. For example,
if a roofer is repairing a leaky roof, then patching some drywall,
the calculations will be different than if a roofer repairs the roof
and a drywall team does the patching.
- Select a Minimum Group for the labor minimum. Click the Labor
Minimums sub-tab to view group descriptions. Learn more about
labor minimums.
- Click the Calculator icon
to edit the unit price.
- Click the Info icon
 next to a price to view the item activity information.
- In the Item Activity Information dialog
box, you can edit the price calculations to account for market
conditions or additional material costs.
- Click Details to view
labor, equipment, and material details.
- To save the changes, click OK.
The Unit Price now appears in green font to indicate that it was
manually updated.
- The unit price can also be changed by clicking
the unit price button in the quick
entry pane or clicking the unit price of an item in the line
item list area.
- On the Estimate Items
tab, click Items.
- Select a line item.
- Click Amounts to the right
of the Quick Entry Pane.
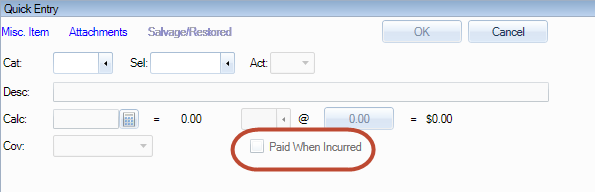
Paid when incurred will not appear for all profiles.
- On the Estimate Items tab, select an item.
- In the Quick Entry pane, select Paid
When Incurred.
With the Item Property Editor, you can edit properties specific to a
line item that aren’t calculated elsewhere. Common properties that can
be edited are the SKU and waste for flooring and roofing items. To view
and edit item properties, double-click the properties icon  in the line item list.
- On the Estimate Items tab, add or select an item.
- On the right of the Quick Entry pane, click Unit
Price.
- To apply overhead and profit to the item, click O&P.
- Click OK.
- On the Estimate Items tab, select an item. The item information
appears in the Quick Entry dialog box.
- Click the Act: box, and
select a new activity code.>
- Click OK.
 The Salvage
Amount must be less than the Replacement Cost Value.
The Salvage
Amount must be less than the Replacement Cost Value.
 The Not
Restored option is only available for FEMA flood estimates.
The Not
Restored option is only available for FEMA flood estimates. The Restored
option is only available for FEMA flood estimates.
The Restored
option is only available for FEMA flood estimates.