EDIT STAIRCASES
Change the number of risers on a staircase
- On the sketch workspace, select a staircase.
- Click the Properties icon
 to
open the Properties dialog box.
to
open the Properties dialog box.
- In the Staircase group, in the No. of risers box, enter the number
of risers.
- Click anywhere on the sketch workspace to save your changes.
Change the stair overcut
- On the sketch workspace, select a staircase.
- Click the Properties icon
to
open the Properties dialog box.
- In the Staircase group, in the Stair Overcut box, enter the amount
of overcut.
- Click anywhere on the sketch workspace to save your changes.
Change the total rise on a staircase
- On the sketch workspace, select a staircase.
- Click the Properties icon
to
open the Properties dialog box.
- In the Staircase group, in the Total Rise box, enter the rise height.
- Click anywhere on the sketch workspace to save your changes.
Change the tread base height on a staircase
- On the sketch workspace, select a staircase.
- Click the Properties icon
to
open the Properties dialog box.
- In the Staircase group, in the Tread Base Height box, enter the
tread base height.
- Click anywhere on the sketch workspace to save your changes.
Change the tread depth on a staircase
- On the sketch workspace, select a staircase.
- Click the Properties icon
to
open the Properties dialog box.
- In the Staircase group, in the Tread Depth box, enter the tread
depth.
- Click anywhere on the sketch workspace to save your changes.
Change the tread overhang on a stair
- On the sketch workspace, select a staircase.
- Click the Properties icon
to
open the Properties dialog box.
- In the Staircase group, in the Tread Overhang box, enter the tread
overhang measurement.
- Click anywhere on the sketch workspace to save your changes.
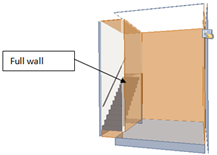
Remove walls from a staircase
- On the sketch workspace, select a staircase wall.
- Click the Properties icon
to
open the Properties dialog box.
- In the Dimensions group, in the Wall Type box, select Missing (end
to end).
- Click anywhere on the sketch workspace to save your changes.
Change the wall type on a staircase
- On the sketch workspace, select a staircase wall.
- Click the Properties icon
to
open the Properties dialog box.
- In the Dimensions group, in the Wall Type box, select a wall type.
- Full – This is the
default setting. The wall runs from the floor to the ceiling of
the room.
- Missing (end to end)
- There is no wall.
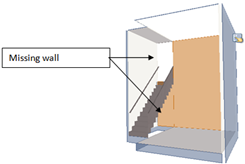
- Missing Above Stairs
- The wall above the stair stringboard is missing.
- Partially Missing Above Stairs
- The wall above the railing is missing.
- Click anywhere on the sketch workspace to save your changes.
Related topics